

Crispy chicken—it’s the stuff of food dreams! Whether it’s a family dinner, a picnic treat, or a weekend indulgence, crispy chicken never fails to hit the spot. But have you ever wondered what is the trick to getting crispy chicken every single time? Is it the breading? The oil temperature? Or maybe a secret ingredient that’s been passed down through generations?
This article dives into the foolproof methods, insider tips, and science-backed techniques to achieve that perfect crunch every time. From prepping your chicken to choosing the right cooking method, we’ll guide you step by step. And, of course, we’ll also highlight common mistakes so you can avoid soggy disasters.
Introduction to Crispy Chicken
Why Crispy Chicken is Everyone’s Favorite
Crispy chicken isn’t just food; it’s a sensory experience. The golden crust, that first crunchy bite, and the juicy tenderness underneath create a combination that’s hard to resist. No wonder crispy chicken is a favorite across the globe, from fried chicken joints in the United States to spicy variations in South Korea.
People often wonder what makes crispy chicken so magical. Is it the sound of the crunch? Or perhaps it’s the perfectly balanced texture? Whatever the reason, one thing’s clear: achieving that golden, crunchy perfection can feel like a culinary victory.
The Challenges of Getting Crispy Chicken
But let’s be honest—perfectly crispy chicken doesn’t happen by accident. It’s a tricky art to master, and many home cooks have faced their fair share of struggles. From chicken that turns out soggy to breading that falls off, these frustrations are all too common.
The good news? It’s all about technique. With the right approach, anyone can learn how to make chicken crispy. Whether you’re frying, baking, or even using an air fryer, there’s a method for everyone.
What to Expect in This Guide
In this step-by-step guide, we’ll break down everything you need to know about crispy chicken, from understanding why chicken sometimes becomes soggy to expert cooking tips. You’ll also learn how temperature, seasoning, and preparation play pivotal roles in your success. So, if you’ve ever wondered what is the trick to getting crispy chicken, stick around—we’ve got all the answers you need!
What is the Trick to Getting Crispy Chicken?
What is the ultimate secret to crispy chicken? It boils down to a perfect trifecta: controlling moisture, achieving the right crust, and layering seasoning for maximum flavor. The crispiness isn’t just about frying—it’s a combination of thoughtful preparation, proper cooking techniques, and selecting the best ingredients. Let’s break it down step by step so you can finally master the art of crispy chicken at home.
The Balance of Moisture: Why It Matters
One of the biggest hurdles in making crispy chicken is dealing with moisture. Moisture is the enemy of crunch! Excess water in or on the chicken prevents the breading from adhering properly and can lead to soggy results. The trick is to minimize moisture every step of the way:
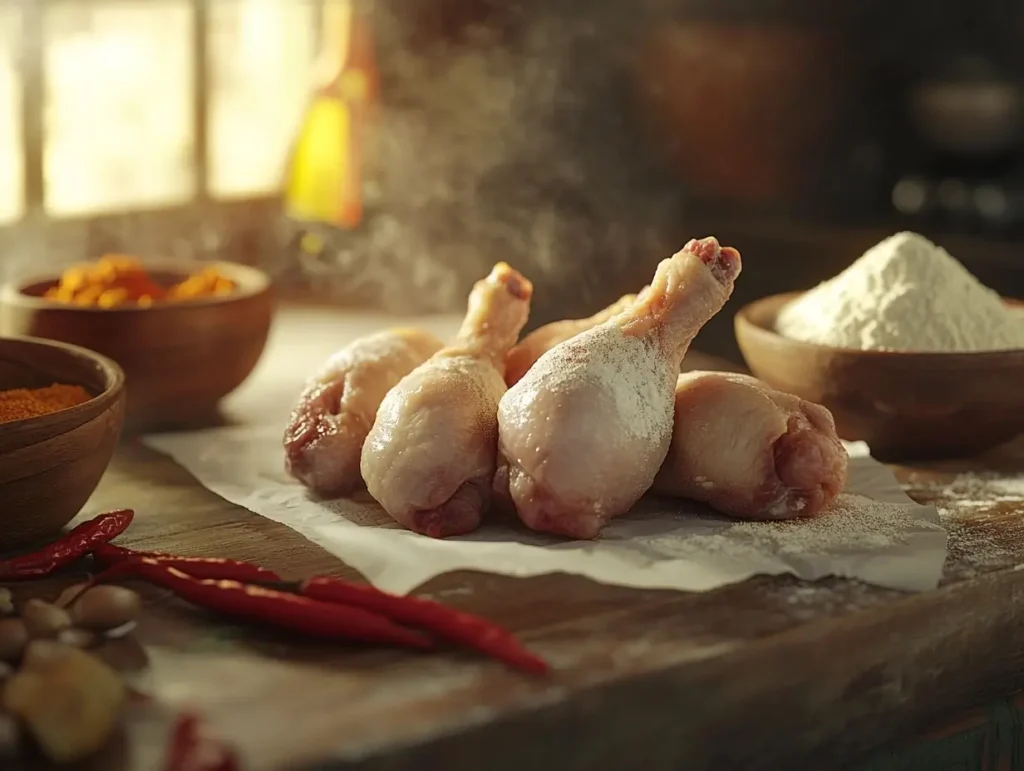
- Patting the chicken dry: Before breading, always pat the chicken thoroughly with paper towels. This removes surface moisture, ensuring the coating sticks better.
- Seasoning directly: If you’re using salt or a marinade, don’t skip the step of blotting off any excess liquid before coating.
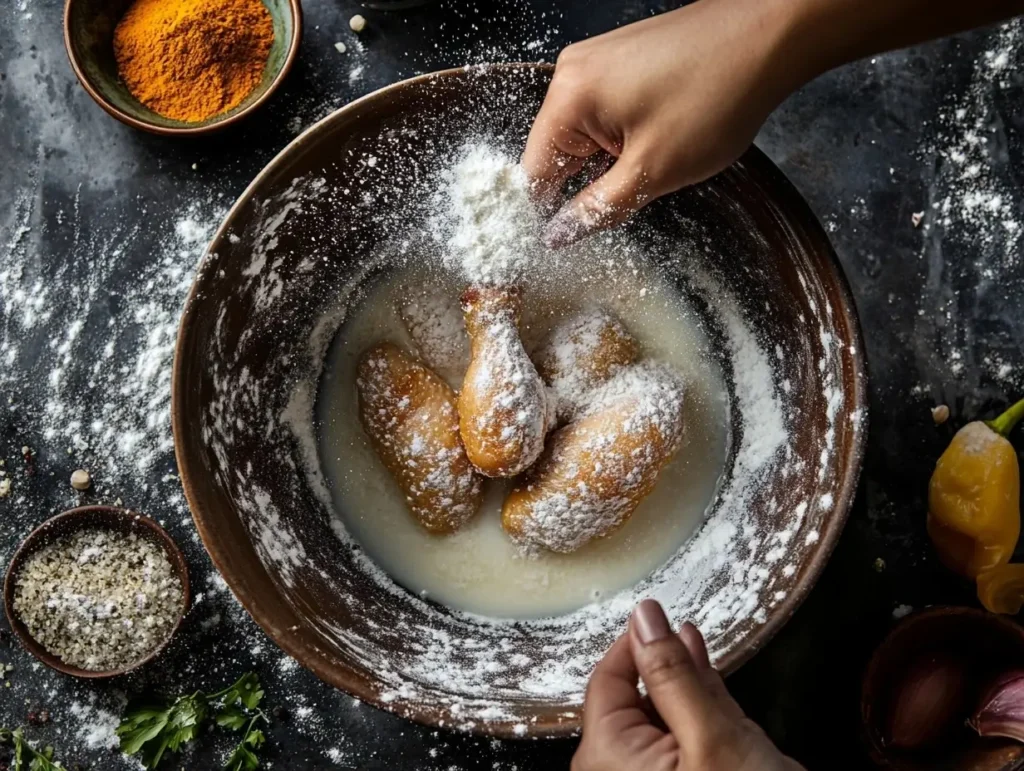
- Double coating: A well-applied double coating (with a dip in buttermilk or egg wash in between) can lock out residual moisture, creating a thicker and crispier crust.
Keeping moisture levels low is the foundation for achieving that signature crunch.
The Role of the Crust: Building That Perfect Bite
The crust is the star of crispy chicken. It’s where all the texture lives! The crust’s success depends on a combination of the right coating and cooking method:
- Flour and Starch Mix: Many recipes use a blend of all-purpose flour and cornstarch to create a light, flaky crust. Cornstarch, in particular, helps to create an extra-crispy texture because it absorbs less oil than flour.
- Bread Crumbs or Panko: For an even crunchier finish, breadcrumbs (or their flaky cousin, panko) are often added to the coating. They create an airy crust that crackles when you bite into it.
- Proper Breading Technique: The dredging process (flour → liquid → flour again) ensures the crust is thick and evenly distributed, avoiding those dreaded bald spots.
Why Cooking Methods Make a Difference
Different cooking methods can produce crispy chicken, but they each have unique advantages:
- Frying: Deep-frying is the traditional choice for crispy chicken. It immerses the chicken in hot oil, cooking it quickly and locking in moisture while crisping the outside. Maintaining the oil temperature between 325–350°F is crucial for even browning.
- Baking: Baking is a healthier alternative that can still yield crispy results, especially if you preheat your baking sheet and lightly coat the chicken with oil or cooking spray. Using a wire rack to elevate the chicken helps circulate hot air, ensuring it crisps on all sides.
- Air-Frying: This method has gained massive popularity for creating crispy chicken with minimal oil. The rapid circulation of hot air mimics the effect of frying, making it a great option for those seeking a crunchier finish with fewer calories.
The Importance of Ingredients and Preparation
Finally, it all comes down to what you put into your recipe. Fresh chicken, flavorful seasonings, and the right type of oil make a world of difference. Even something as simple as marinating your chicken in buttermilk or brine before cooking can transform the outcome. The acidity in buttermilk tenderizes the meat while also giving the breading something to cling to, which makes the crust even more irresistible.
Preparation is equally important. Rushing the process—whether it’s skipping the pat-dry step, not letting the chicken rest after frying, or frying at the wrong temperature—can lead to disappointment. Take the time to plan every step, and your chicken will reward you with that crispy, golden perfection.
With moisture in check, a crackly crust in place, and the right cooking technique, the question of what is the trick to getting crispy chicken becomes less of a mystery and more of a sure thing. Up next: how moisture missteps can lead to soggy disasters and how to avoid them!
Why Does Chicken Become Soggy?
There’s nothing more disappointing than biting into what you hoped would be crispy chicken, only to find a soggy mess instead. So, what is the trick to getting crispy chicken, and why does chicken sometimes end up soggy? It all comes down to excess moisture, incorrect cooking techniques, and a few avoidable mistakes that can sabotage your hard work. Let’s uncover the culprits behind soggy chicken so you can steer clear of them and finally figure out what is the trick to getting crispy chicken every time!
Excess Moisture: The Top Culprit
Moisture is the sworn enemy of crispy chicken. If the chicken isn’t properly dried before cooking, that water seeps into the breading, preventing it from crisping up. Whether it’s from residual water after washing the chicken or liquid from a marinade, skipping the step of patting the chicken dry is one of the most common pitfalls.
- What is the trick to getting crispy chicken here? Always pat your chicken thoroughly with paper towels to remove surface moisture before breading.
Another sneaky source of excess moisture is steam. For instance, if you cover the chicken immediately after frying or baking, the trapped steam will turn that crunchy crust soft in no time. To keep your chicken crispy, always allow it to rest in a way that avoids steam buildup.
Incorrect Cooking Temperatures
Cooking at the wrong temperature can doom your crispy chicken dreams. If the oil or oven temperature is too low, the chicken absorbs more oil, which makes the crust greasy and soft. On the flip side, cooking at too high a temperature can burn the outside before the inside is fully cooked, leaving you with uneven textures.
- Wondering what is the trick to getting crispy chicken at the right temperature? Use a thermometer to maintain a steady oil temperature between 325–350°F, or preheat your oven to 400°F for even baking.
Overcrowding the Pan: A Recipe for Disaster
Overcrowding the pan while frying or baking is a common mistake that leads to soggy results. When the pan is too crowded, the heat distribution becomes uneven, and the chicken ends up steaming instead of frying. This extra moisture prevents the crust from crisping up, leaving you with disappointing results.
- A key part of what is the trick to getting crispy chicken is frying in small batches. Give each piece plenty of space to fry evenly, and your chicken will thank you with that signature crunch.
Skipping Resting Techniques
Believe it or not, how you rest your chicken after cooking can make or break the crunch. Placing freshly cooked chicken directly onto a flat surface traps heat and moisture, making the underside soggy. Resting fried chicken on a wire rack allows air to circulate, keeping it crispy all over.
- If you’re still wondering what is the trick to getting crispy chicken, don’t skip this crucial step! Proper resting ensures your chicken retains its crunch from all angles.
By addressing these common mistakes—excess moisture, temperature mismanagement, and overcrowding—you can finally understand what is the trick to getting crispy chicken. Stick to these solutions, and soggy disasters will become a thing of the past!
Step-by-Step Guide to Making Crispy Chicken
Perfectly crispy chicken requires careful attention at every stage, from prepping to cooking to resting. Below is a complete step-by-step guide to help you achieve that golden, crunchy crust every single time. Each phase has its own secrets, so follow along and take notes!
Prepping the Chicken
Properly cleaning and preparing raw chicken is essential to prevent contamination in your kitchen. For more information on how to safely handle raw chicken, you can refer to this comprehensive guide from Healthline.
- Cleaning the Chicken: Start by rinsing your chicken under cold water to remove any residue. While some debate washing chicken due to contamination risks, be sure to clean thoroughly and sanitize your area afterward.
- Trimming Excess Fat: Use kitchen shears or a sharp knife to remove excess fat or skin that can interfere with even cooking.
- Patting the Chicken Dry: Moisture is the enemy of crispiness. Use paper towels to pat the chicken completely dry. This step helps the breading stick better and prevents steam from forming during cooking.
Choosing the Right Breading
The breading is where the magic happens. The right combination of ingredients gives the chicken its crackly, irresistible texture.
- Flour Types:
- All-Purpose Flour: The most commonly used for breading, offering a solid foundation.
- Cornstarch: This secret ingredient adds extra crispiness by absorbing less oil.
- Breadcrumbs/Panko: These provide an airy, crunchy texture. Japanese-style panko breadcrumbs are especially popular for achieving a light crust.
- Seasoning Combinations: A well-seasoned breading makes all the difference. Common choices include salt, pepper, paprika, garlic powder, onion powder, cayenne pepper, or Italian seasoning. Mixing these spices into your flour ensures every bite is flavorful.
Coating Techniques
Your coating method will determine how well the crust adheres to the chicken. The classic single-coat or double-coat methods are your best bets.
- Single Coating: Dip the chicken in flour, then fry or bake. Simple, but can sometimes lead to thinner crusts.
- Double Coating: For a thicker, crispier crust, follow these steps:
- Dredge the chicken in seasoned flour.
- Dip it into a wet mixture, such as buttermilk or egg wash.
- Dredge it again in seasoned flour or breadcrumbs.
- Tips for Even Coating: Shake off excess flour after each step to avoid clumps. Ensure all surfaces are evenly coated for consistent crispiness.
Cooking Methods for Crispy Chicken
Once your chicken is prepped and coated, the next step is cooking. Whether you’re frying, baking, or air-frying, the method you choose will impact the final result. Below is a comparison of the main cooking methods:
| Cooking Method | Pros | Tips |
|---|---|---|
| Deep-Frying | Fast, crispy, and evenly golden crust. | Maintain oil temp between 325–350°F; don’t overcrowd. |
| Oven-Baking | Healthier, less greasy, still crispy. | Preheat baking sheet; use wire rack for even cooking. |
| Air-Frying | Minimal oil, excellent crunch. | Shake basket occasionally; don’t skip preheating. |
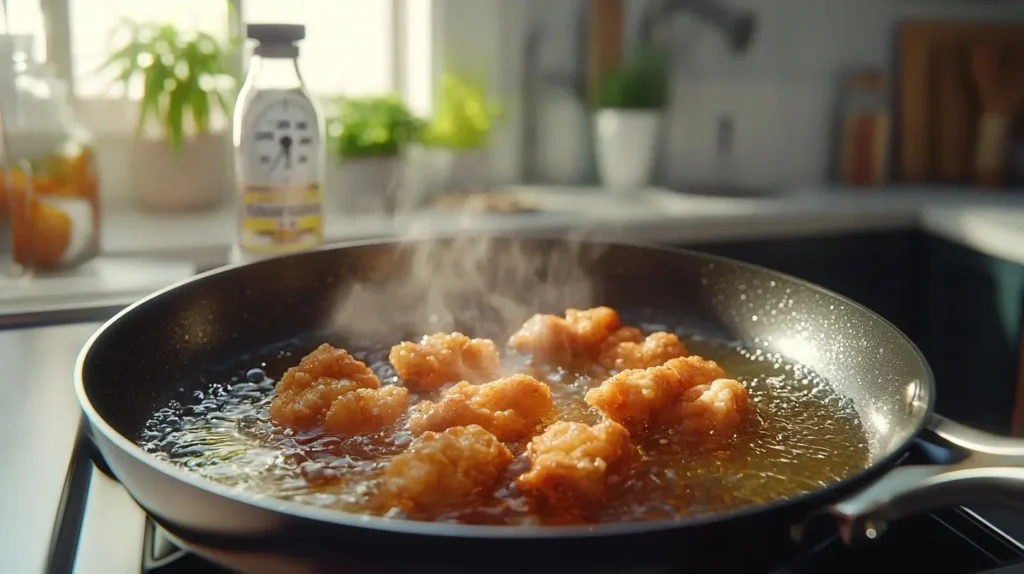
Deep-Frying
Deep-frying is the most traditional method for crispy chicken and provides the best results when done correctly.
- Oil Type: Use oils with high smoke points, like vegetable, canola, or peanut oil.
- Temperature: Keep the oil between 325–350°F. Too low, and the chicken absorbs too much oil; too high, and it burns.
- Timing: Fry small batches of chicken to avoid overcrowding, and cook until golden brown (about 12–15 minutes for bone-in pieces).
Oven-Baking
Baking is a healthier option that can still deliver a satisfyingly crispy crust.
- Convection Ovens: These circulate air for an extra-crispy finish.
- Preheating Baking Sheets: A hot surface helps crisp the bottom of the chicken.
- Wire Rack Tip: Elevate the chicken on a wire rack to allow hot air to circulate and crisp all sides.
Air-Frying
Air-frying has surged in popularity thanks to its convenience and ability to create crispy textures with little to no oil.
- Preheating: Don’t skip preheating your air fryer for an even cook.
- Cooking in Batches: Avoid overcrowding the basket, as this prevents proper air circulation.
- Shaking the Basket: This ensures every part of the chicken gets crispy.
Resting the Chicken
One often-overlooked step is resting the chicken after cooking. This is key to preserving its crispiness.
- Why Resting Matters: Resting helps the chicken retain its crunch by allowing excess oil to drip off.
- How to Rest: Place the chicken on a wire rack instead of paper towels or a flat surface. Paper towels can trap heat and create steam, softening the crust. A wire rack allows airflow, keeping the underside crisp.
By following this step-by-step guide, you’re well on your way to making perfectly crispy chicken, no matter which method you prefer. The next time you’re in the kitchen, remember these tips, and you’ll never have to wonder why your chicken didn’t turn out crispy again!
Common Mistakes to Avoid When Making Crispy Chicken
Achieving crispy chicken isn’t rocket science, but it does require avoiding a few common mistakes that can ruin the texture and flavor. Here’s a rundown of the most frequent errors people make and how to fix them to ensure your chicken comes out crispy every time.
Using Cold Chicken Straight from the Fridge
One of the most overlooked mistakes is cooking chicken straight from the refrigerator. When cold chicken hits hot oil, it drastically lowers the oil temperature, leading to uneven cooking and a greasy, soggy crust.
- Solution: Always let the chicken sit at room temperature for about 20–30 minutes before cooking. This ensures more even cooking and helps the breading crisp up properly.
Skipping Seasoning in the Breading
A well-seasoned crust is essential for crispy chicken that’s not just crunchy but also flavorful. Forgetting to add spices to the breading can result in bland chicken, no matter how crispy it is.
- Solution: Add salt, pepper, and your favorite spices (paprika, garlic powder, cayenne, etc.) directly into the flour, breadcrumbs, or batter. Season every layer for maximum flavor.
Not Maintaining Consistent Oil Temperature
If the oil temperature drops too low, the chicken will absorb excess oil, making it greasy. Conversely, if the oil is too hot, the crust will burn before the chicken cooks through.
- Solution: Use a thermometer to monitor the oil temperature, keeping it steady between 325–350°F. Cook in small batches to avoid overcrowding, which can lower the temperature.
By steering clear of these common mistakes—cold chicken, bland breading, and fluctuating oil temps—you’ll be on your way to making crispy chicken that’s both golden and delicious. Stick to these fixes, and your crispy chicken will turn out perfect every time!
Expert Tips for the Best Crispy Chicken
Cooking crispy chicken like a pro doesn’t require a culinary degree—just a few insider tricks to take your chicken game to the next level. From using pantry staples like cornstarch and baking powder to layering seasoning strategically, these expert tips will make a world of difference. Let’s break it down!
The Role of Cornstarch or Baking Powder
Cornstarch and baking powder are the unsung heroes of crispy chicken. These ingredients work wonders in creating that signature crunch.
- Cornstarch: A go-to for many chefs, cornstarch helps absorb less oil than flour while creating a crispier crust. Mixing it into your flour (about 1 part cornstarch to 3 parts flour) can transform the texture of your breading.
- Baking Powder: This leavening agent adds a slight lift to your breading, making it lighter and crispier. It also helps the crust brown more evenly.
- Pro Tip: Combine both cornstarch and baking powder for the ultimate crispy coating!
| Ingredient | Purpose | How to Use |
|---|---|---|
| Cornstarch | Adds crispiness and absorbs less oil | Mix with flour in a 1:3 ratio for breading. |
| Baking Powder | Creates a light, airy texture | Add 1 tsp to every cup of flour mixture. |
Marination Tips
Marination isn’t just about flavor—it also helps create a juicier inside that contrasts beautifully with a crispy outside.
- Buttermilk Soak: Buttermilk is slightly acidic, which tenderizes the chicken and helps the breading adhere. Let the chicken soak for at least 2 hours (or overnight for the best results).
- Brining: If you prefer a saltwater-based approach, brining locks in moisture and seasons the chicken all the way through. A simple brine of salt, sugar, and water (with optional spices) works wonders.
- Pro Tip: Whichever method you choose, pat the chicken dry before breading to avoid excess moisture in the crust.
Seasoning Layers
A common mistake is only seasoning one part of the chicken—usually the breading. To achieve maximum flavor, you need to season every layer.
- Season the Chicken: Start with salt and pepper directly on the chicken before breading. This ensures the meat itself is flavorful.
- Season the Flour or Breadcrumbs: Add spices like paprika, garlic powder, onion powder, cayenne pepper, or Italian seasoning into your flour or breadcrumb mixture. This adds flavor to the crust.
- Season the Wet Layer: If you’re using buttermilk or an egg wash, season it lightly with salt or hot sauce to add another layer of taste.
- Pro Tip: Taste-test the flour mixture by sprinkling a bit on your tongue—this helps ensure the seasoning is balanced.
Practical Advice for Perfect Results
Even with the best ingredients, a few practical techniques will make all the difference in achieving crispy chicken:
- Use a Thermometer: Monitoring oil temperature is essential. Keep the heat steady at 325–350°F when frying.
- Avoid Overcrowding the Pan: Cook chicken in small batches so the oil stays hot and the chicken has room to crisp evenly.
- Resting on a Wire Rack: After cooking, place the chicken on a wire rack instead of paper towels. This prevents trapped steam from softening the crust.
- Shake Off Excess Coating: When breading, lightly shake off excess flour or breadcrumbs. Too much coating can result in a dense, clumpy crust.
By using tricks like incorporating cornstarch, soaking the chicken in buttermilk, and seasoning every layer, you’ll be well on your way to mastering crispy chicken that’s bursting with flavor and crunch. Ready to give it a try? Up next: how cooking temperatures can make or break your crispy chicken!
How Does Temperature Affect Crispy Chicken?
When it comes to making crispy chicken, temperature is one of the most critical factors. Getting it right can mean the difference between a perfectly crunchy crust and a soggy, greasy disappointment. But why is temperature so important? Let’s explore the science behind it.
The Maillard Reaction: The Secret to Crispy Crust
The Maillard reaction is the chemical process that occurs when proteins and sugars in the chicken’s coating react to high heat, creating that irresistible golden-brown crust. For this reaction to happen effectively, you need to cook at the right temperature.
- High Heat, Perfect Crunch: Cooking at the correct temperature ensures that the Maillard reaction develops fully, giving you a crispy, flavorful crust.
- Too Low? Soggy Disaster: If the oil or oven is too cool, the chicken absorbs more oil, leading to a greasy and soft crust.
The Risks of Undercooking or Overcooking
Temperature doesn’t just affect the crust—it’s crucial for the meat inside as well. Undercooked chicken is unsafe, while overcooked chicken can turn dry and tough.
- Undercooked Chicken: If the internal temperature doesn’t reach 165°F, bacteria like salmonella can survive, making the chicken unsafe to eat.
- Overcooked Chicken: Cooking too long or at excessively high temperatures can leave you with dry, chewy meat that’s far from enjoyable.
Temperature Guidelines for Crispy Chicken
- For Frying: Keep the oil temperature between 325–350°F. Use a thermometer to monitor the heat, as this range ensures even cooking and prevents oil absorption.
- For Baking: Preheat the oven to 400°F and use a convection setting if possible. Baking at this temperature creates a crispy crust without drying out the meat.
Mastering temperature control is the key to perfectly crispy chicken that’s crunchy on the outside and juicy on the inside. Stick to these guidelines, and you’ll never have to worry about soggy or overcooked chicken again!
FAQs About Getting Crispy Chicken
Achieving perfectly crispy chicken can feel like a daunting task, but understanding the answers to some frequently asked questions can make the process much easier. Below are clear answers to common concerns, so you can troubleshoot and improve your crispy chicken-making skills.
Why isn’t my chicken crispy after frying?
The most common reason chicken isn’t crispy after frying is due to excess moisture or low oil temperature. If the chicken isn’t patted dry before breading or if the oil drops below 325°F during frying, the crust absorbs too much oil and turns soggy.
- Fix It: Always dry the chicken thoroughly, maintain oil at a steady 325–350°F, and avoid overcrowding the pan, which can lower the oil temperature.
How to pan fry chicken sausage?
Pan-frying chicken sausage is quick and easy. Heat a nonstick skillet over medium heat, add a tablespoon of oil, and cook the sausages for 6–8 minutes, turning frequently. Ensure the internal temperature reaches 165°F for fully cooked sausages.
How long to pan fry boneless chicken thighs?
Boneless chicken thighs take about 6–8 minutes per side to cook over medium-high heat. The total cooking time depends on thickness, but always use a meat thermometer to ensure the internal temperature reaches 165°F.
Why soak chicken in milk before frying?
Soaking chicken in milk or buttermilk before frying serves two purposes:
- The acidity in buttermilk tenderizes the chicken, making it juicy.
- It creates a sticky surface that helps the breading adhere better, resulting in a crispy crust.
Letting the chicken soak for at least 2 hours (or overnight) gives the best results.
Is it better to pan fry chicken in butter or oil?
While butter adds flavor, it has a lower smoke point and can burn quickly. Oil, particularly those with high smoke points like vegetable, canola, or peanut oil, is better for frying chicken because it maintains a steady temperature and ensures crispiness.
- Best Option: Use oil for frying and add a little butter at the end for flavor, if desired.
Check out Does Butter or Oil Make Chicken Crispier? The Ultimate Guide to Perfect Crispy Chicken for a full comparison.
Does butter or oil make chicken crispier?
Oil makes chicken crispier because it fries the breading evenly at higher temperatures. Butter, on its own, doesn’t crisp the chicken as effectively due to its tendency to burn. However, combining oil and butter can give you crispiness with a touch of buttery flavor.
What is the secret to good fried chicken?
The secret to great fried chicken lies in a few key steps:
- Use buttermilk for marinating to tenderize the meat.
- Season every layer (chicken, flour, and wet batter) for flavorful bites.
- Maintain a steady oil temperature between 325–350°F.
- Rest the chicken on a wire rack after frying to keep the crust crispy.
For an in-depth breakdown of every step, you can refer to The Ultimate Guide to the Secret of Good Fried Chicken, which provides a comprehensive approach to mastering this dish.
What not to do when frying chicken?
Avoid these common mistakes:
- Overcrowding the pan: This lowers the oil temperature and prevents even frying.
- Skipping the pat-dry step: Excess moisture causes soggy breading.
- Frying at inconsistent temperatures: Use a thermometer to monitor the heat.
- Skipping resting: Always let fried chicken rest on a wire rack for a few minutes to allow excess oil to drip off and preserve crispiness.
For a complete list of mistakes to avoid, check out What Not to Do When Frying Chicken: Avoid These Common Mistakes.
These FAQs cover the most common challenges and questions about making crispy chicken, ensuring your next batch is a crunchy success. Now you’re armed with the knowledge to avoid mistakes and master the art of fried perfection!
Conclusion and Final Thoughts
What is the trick to getting crispy chicken? It isn’t just about frying; it’s about thoughtful preparation, precise techniques, and keeping an eye on temperature control. Throughout this guide, we’ve uncovered all the essential steps to achieving that coveted golden crunch. From patting the chicken dry and selecting the best breading to mastering frying, baking, or air-frying methods, you now have everything you need to make your crispy chicken dreams come true.
So, what is the trick to getting crispy chicken every single time? It starts with managing moisture—always dry your chicken thoroughly and avoid overcrowding the pan, which causes steam. Then, build the perfect crust by carefully layering your breading, seasoning every stage, and considering the magic of cornstarch or baking powder. Finally, maintain the right temperature—keep your frying oil steady between 325–350°F and monitor it with a thermometer to avoid greasy or burnt chicken.
If you’ve ever wondered what is the trick to getting crispy chicken, the answer lies in balancing these three elements: moisture control, a well-seasoned crust, and precise heat management. Don’t let past mistakes discourage you! Crispy chicken is well within your reach when you follow these methods.
Whether you’re preparing fried chicken for a weekend dinner or healthier baked chicken for a weekday treat, keep asking yourself, what is the trick to getting crispy chicken? Every time you revisit this guide, you’ll find practical tips to make it happen.
So, why wait? Head to your kitchen, put these tips into action, and experience the joy of biting into chicken that’s crispy on the outside and tender on the inside. What is the trick to getting crispy chicken? Now you know—and you’re ready to make it happen. Crispy perfection is just a few steps away!